This browser is not supported. To ensure the best possible user experience, please use one of the following browsers:
Chrome | Firefox | Internet Explorer | Safari | Opera

Support Center

Our frequently asked questions service offers answers to common questions. If you don't find an answer, please contact our customer support and a representative will be able to assist you.

Overview

How do I sign up or activate my account?

PlanNet Marketing will create a/an PlanNet Marketing on your behalf. Once created, an email will be sent to you with a link you can use to begin the activation process.

If you have been notified by PlanNet Marketing that your first payment has been sent but have not received an activation email, click here.

If you have any questions about creating a Payment Portal, please visit PlanNet Marketing Help Center or contact PlanNet Marketing for support.

How do I log in to the Pay Portal?
  1. Enter your Username and Password on the login page.
  2. Click Sign In

If you're unable to access your Pay Portal and are receiving an "Error 104" message, find your IP address and contact us for assistance. 

How do I change my profile information?
  1. Log in to your Pay Portal.
  2. Click Settings > Profile
  3. Make the changes.
  4. Click Save

If you are unable to update your information, please contact PlanNet Marketing directly.

How do I change my account password?
  1. Log in to your Pay Portal.
  2. Click Settings > Security
  3. Enter your existing password.
  4. Enter and confirm a new unique password.
  5. Click Update Password

Password requirements:

  • At least 1 upper case letter
  • At least 1 lower case letter
  • At least 1 number
  • At least 8-128 characters long
  • At least 1 special character
  • Not used before.
What should I do if I've forgotten my password?
  1. Click Forgot Your Password? on the Pay Portal login page.
  2. Enter the email address registered on your Pay Portal.
  3. A password reset notification will be sent to this email. Click the Reset Password link. This will direct you to a page where you can enter and confirm your new password.

NOTE: You may be required to complete an additional authentication step to verify your identity. If prompted, choose one of the options and follow the on-screen instructions.

  1. Enter and confirm a new unique password.
  2. After successfully resetting your password, a confirmation email will be sent to your email. Click Return to Login Page and use your new password to log in to the Pay Portal.

Account Verification

What information needs to be verified?

Verification of person identified as the account holder:

  • Government / National ID
  • Passport
  • Driver’s License

Information on the submitted documents must be current and clearly visible. Up to 2 pieces of identification may be required.

Verification of account holder’s address:

  • Utility bill (e.g., gas, electric, water, cable, phone)
  • Financial statement
  • National ID
  • Government issued documents (e.g., tax bills, balancing statements)

Full name, address, and document validity (dated within the last 12 months) must be clearly visible.

How long does it take to verify my documents?

If the submitted documents meet the above requirements, verification will be within 2 business days. We will send you an email if additional information is required.

Can I use a nickname or alternative name?

No. The name on your profile must match your documents and be your legal given name.

Note: Changes made to your Pay Portal profile may retrigger account verification.

What is the format for providing my date of birth?

MM/DD/YYYY

What should I do if I have submitted the required documents, but transfers are still not working?

Please allow us time to review the documents. We will contact you if any additional information is required and send you an email notification once the review is successful.

I’m trying to upload the requested documents, but it says the file size is too big. What do I do?

If you are trying to upload a photo of a required document and it is too big, save as .png or .jpeg to reduce the size. The file size should be under 4MB.

Does the address on the verification document need to match my Pay Portal profile?

Yes. The address on your Pay Portal (under Settings > Profile) needs to be exactly the same.

If you are not able to update your profile address, please contact PlanNet Marketing directly.

Taxpayer Verification

Why did my Substitute Form W-9 fail verification?
  • First and/or Last Names registered on your Pay Portal do not match IRS records.
  • Middle Name or initial is on file with the IRS but not included on your Pay Portal profile. If you have a middle name or initial, please add it in the “First Name” field and separate it by a space.
  • Social Security Number (SSN) on your Pay Portal profile is incorrect or contains spaces or dashes. The format should be 9 digits.
  • Business Name and/or Employer Identification Number (EIN) may not yet be available across all IRS systems if your EIN was issued less than 4 weeks ago.
  • Internal Revenue Service (IRS) servers are experiencing high volume or downtime.
  • There have been multiple unsuccessful attempts to verify.
How do I update the name or Social Security Number displayed on my Substitute Form W-9?
  1. Log in to your Pay Portal.
  2. Click Settings > Profile
  3. Make the required changes. Click Save.
  4. Click Home to resubmit your Substitute Form W-9 using the updated information.

To update any information which cannot be edited on the Profile page, contact PlanNet Marketing directly.

Updates made by PlanNet Marketing to your profile information may take several days to reflect on your Pay Portal. Once the changes have been applied, the Substitute Form W-9 will be made available again for submission on the Home page.

How do I need to complete a Certificate of Foreign Status (tax Form W-8BEN/W-8BEN-E)?
  1. Log into your account.
  2. Download the Certificate of Foreign Status by filling out the W-8BEN form for individuals, or W-8BEN-E if you're a business.
  3. Complete, sign the printed Form, and upload them back into the Pay Portal.

Note: Only a single file can be submitted. Ensure that your submission is clear and legible. Scan the entire form, including unmarked or unused pages. The file must be smaller than 4 MB with a maximum filename of 30 characters in PDF, TIFF, JPG, or PNG format. 

Why do I need to complete a Certificate of Foreign Status (tax Form W-8BEN/W-8BEN-E)?

All US payment processors, including Hyperwallet, are required by the US Internal Revenue Service (IRS) to provide information to the IRS regarding account holders who receive payments for the sale of goods and services above the reporting threshold in a calendar year.

In order for Hyperwallet to satisfy its information reporting obligations under IRS rules and regulations, we require that Hyperwallet account holders (with a U.S. person tax status globally) who approach the applicable thresholds (of $600 USD) set by the IRS verify their U.S. tax status either by completing a Certificate of Foreign Status or providing a US Taxpayer Identification Number (TIN).

Am I eligible to receive a Form 1099?

If your total payments from PlanNet Marketing meet or exceed the IRS threshold of $600 USD over the course of the tax year, you are eligible to receive a Form 1099.

If you are unsure about whether or not you meet this requirement, you can view a list of your total payments for a given period by logging in to your Pay Portal and following these steps:

  1. Click History
  2. Adjust the “To” and “From” dates. Maximum search history is 365 days.
  3. Select Load funds as the Transaction Type.
  4. Click Search
  5. If necessary, to view more payment information on a single page, increase the number of rows displayed on the search results.
  6. Calculate your total earnings by adding up the values in the “Credit” column.

In addition to meeting the $600 USD IRS threshold, a Substitute Form W-9 must be submitted and in good standing prior to December 31st of the year a Form 1099 is issued.

If you meet the IRS threshold of $600 USD but your Substitute Form W-9 was submitted after this deadline, contact PlanNet Marketing directly for assistance obtaining your Form 1099.

How do I view my Form 1099?
  1. Log in to your Pay Portal
  2. Click Resources > Tax Documents
  3. Locate your Form 1099 under “Available Year End Tax Forms”.
  4. Click Action > Download

NOTE: During tax season, you may experience longer than usual wait times for your tax documents to be displayed. If the tax document you are looking for does not display immediately, wait a few extra minutes or try using a different web browser if the issue persists.

Withdrawing Funds

How do I transfer funds from my Pay Portal to my bank account?

If your organization allows it, you can transfer your Pay Portal balance to any bank account in your country.

To register a new bank account:

  1. Log in to your Pay Portal.
  2. Click Transfer > Add New Transfer Method
  3. Select the country and currency of the bank account that the funds will be transferred to.
  4. Click Bank Account > Continue
  5. Enter your account details including a nickname for the transfer method in the “Remember As” field (for example, “My Savings”). Click Continue
  6. Carefully verify that your bank information is correct, as incorrect information may cause significant delays to your transfer.
  7. Click Confirm

To transfer funds to a bank account that has already been registered on your Pay Portal:

  1. Click Transfer > Action > Transfer to Bank Account
  2. Select an option on the “From” dropdown panel.
  3. Enter the amount you would like to transfer and add a personal note (optional). Click Continue
  4. Review your transfer details.
  5. Click Confirm

Please allow 1 - 3 business days for the funds to be credited to a bank account in North America or Europe and up to 5 business days for other destinations.

What is the maximum amount that I can transfer to my bank account?
Bank transfer amount limits vary depending on the country, the banks that process the transaction, and local financial regulations. If you try to transfer an amount higher than the maximum, you will receive the error “Your attempted transaction has exceeded the approved payout limit”. In this case, you can try a lower amount, or use a different transfer method. You can review alternative transfer methods in the Transfer > Add New Transfer Method section of your Pay Portal.
Where can I find my banking information?

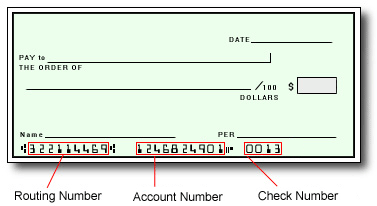
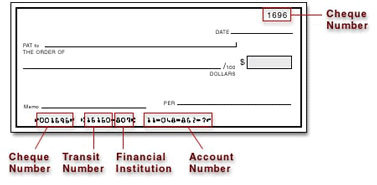
You can obtain your bank information from your financial institution, a bank statement, or by referring to the details on the bottom of your checks.

In the United States and Canada, your account information will be displayed as shown on the sample checks below:

U.S. Accounts:
United States check with bank details

Canadian Accounts:
Canadian check with bank details

How do I set up Auto Transfer?
  1. Log in to your Pay Portal.
  2. Click Transfer
  3. On the Transfer Center next to your preferred transfer method, click Action > Create Auto Transfer
  4. Make sure the “Auto Transfer Enabled” box is checked, then choose between daily and monthly Auto Transfer configurations.
  5. For currency and threshold settings, click More Options
  6. Click Confirm
How do I update my Auto Transfer settings?
  1. Log in to your Pay Portal.
  2. Click Transfer
  3. On the Transfer Center, click Action > Update Auto Transfer
  4. Make the necessary updates.
  5. Click Confirm
How do I update my bank account information?
  1. Log in to your Pay Portal.
  2. Click Transfer
  3. On the Transfer Center, click Action > Update
  4. Update your account information.
  5. Click Continue
  6. Review your profile information and make updates if required.
  7. Click Confirm
How do I view my transaction history?
  1. Log in to your Pay Portal.
  2. Click History
  3. Select a date range and specify the transaction type.
  4. Click Search
How do I transfer to PayPal?

Transfer method availability varies depending on the country, currency and program configurations. Click on Transfer > Add New Transfer Method to see your options. If  the transfer method or your country/region or currency is not listed in the options, it is not supported.

If the PayPal option is available for your program and country, follow these steps to set it up:

  1. Log in to the Pay Portal.
  2. Click Transfer > Add New Transfer Method
  3. If prompted, select your country and currency.
  4. Select PayPal then click Continue
  5. Confirm your email address. Click Continue
  6. Review your account details then click Confirm
  7. Click Transfer To PayPal
  8. Add a personal note (optional) then click Continue
  9. Review the transfer details then click Confirm

If the currency you transfer from the Pay Portal matches the default currency on your PayPal, a confirmation email will be sent and you should receive the funds within 30 minutes.

If the currency you’re transferring does not match the default currency on PayPal, you’ll need to log in to PayPal and accept the transfer manually.

You have 30 days to accept before the transfer amount is returned to the Pay Portal.

Does my Pay Portal email need to match the one saved on PayPal?

Yes. To successfully process and receive a transfer, the email on your Pay Portal needs to be the same one registered with PayPal.

PayPal will send instructions on how to create a new account on their platform and claim the funds if a transfer is processed using an email that isn’t registered in their system.

If you’re already registered with PayPal with an email that doesn’t match the one saved on the Pay Portal, do one of the following:

Add your Pay Portal email to PayPal

  1. Log in to PayPal and click the gear icon at the top of the page.
  2. Click (+) in the Email Address section.
  3. Enter the email registered on the Pay Portal. Your PayPal can support up to 7 email addresses.
  4. PayPal will send a confirmation email to this address. Click Confirm Your Email when you receive the notification.

Change the email on your Pay Portal to match the one saved on PayPal

  1. Log in to the Pay Portal.
  2. Click Settings > Preferences
  3. On the Notifications tab, enter the new email address and your Pay Portal password.
  4. Click Confirm

If you’re unable to update the Pay Portal email address on the Notifications tab, contact PlanNet Marketing directly for assistance.

IMPORTANT: Updating the email on the Pay Portal Notifications tab will not automatically update the email linked to a previously saved PayPal transfer method.

To complete the process, follow these steps:

  1. Click Transfer to return to the Transfer Center.
  2. Click Action > Remove next to the existing PayPal transfer method.
  3. Confirm the details then click Remove this Account
  4. Return to the Transfer Center and click Add New Transfer Method
  5. Follow the prompts to re-add the PayPal transfer method using the updated email.
Can I transfer funds to my Venmo account?

Transfer method availability varies depending on the country, currency and program configurations. Click on Transfer > Add New Transfer Method to see your options. If  the transfer method or your country/region or currency is not listed in the options, it is not supported.

If the transfer method is available in your program, you can transfer funds to your Venmo account from the Pay Portal:

  1. Log in to the Pay Portal.
  2. Click Transfer > Add New Transfer Method > Venmo.
  3. Add the phone number of your Venmo account. Confirm.
  4. Select Transfer to Venmo and confirm the amount.

Note: Transfers to Venmo take up to 30 minutes to complete. Review your information carefully before pressing the Confirm button. Transfers to the wrong account cannot be cancelled or reverted.

Can I request paper checks?
Transfer method availability varies depending on the country, currency and program configurations. Click on Transfer > Add New Transfer Method to see your options. If  the transfer method or your country/region or currency is not listed in the options, it is not supported.

If the Paper Check option is available for your program and country, follow these steps to set it up:
  1. Log in your Pay Portal.
  2. Click Transfer > Add New Transfer Method > Paper Check.
  3. Review your personal information and ensure your address is correct and complete.
  4. Review the applicable processing time and fee, and click Submit.

Note: Paper checks can be deposited in a bank account under your name (matching the name on the check).
How can I transfer funds to my bank's debit card?

Transfer method availability varies depending on the country, currency and program configurations. Click on Transfer > Add New Transfer Method to see your options. If  the transfer method or your country/region or currency is not listed in the options, it is not supported.

You can add your debit card and transfer funds to it from your pay portal:

  1. Log in to the Pay Portal.
  2. Click Transfer > Add New Transfer Method > Debit card.
  3. Enter and confirm your Card Number, Expiration date and CSC.
  4. Click Transfer to Debit.
  5. Enter and Confirm the amount.
 

Note: Transfers to debit cards take up to 30 minutes to complete. Once a transfer is initiated, it cannot be stopped or reverted. Failure to enter your account information correctly may result in your funds being sent to the wrong account where they cannot be recovered.

https://payday.myrandf.com/hw2web/consumer/page/contact.xhtml
How do MoneyGram transfers work?
Transfer method availability varies depending on the country, currency and program configurations. Click on Transfer > Add New Transfer Method to see your options. If  the transfer method or your country/region or currency is not listed in the options, it is not supported.
  1. Log in to your Pay Portal.
  2. Click Transfer > Add New Transfer Method > MoneyGram.
  3. Review your personal information. (It must match the information in your Government ID)
  4. Assign a nickname and Confirm.
  5. Select Transfer to MoneyGram and confirm the amount.
  6. An email confirmation with a receipt will be send via email.
  7. Pick up your cash after 1 hour with your Government ID and the receipt in a MoneyGram location near you. 

Note: The limit per transfer is USD$10,000* and up to USD$10,000 every 30 calendar days.
* Each MoneyGram location sets the limit they can dispense.

Tracking Your Payment/Transfers

What do the payment status descriptions refer to?

Payments and transfers go through various stages while being processed. Updates are noted on your Pay Portal to keep you apprised of your funds and when you can expect them.

What is a Receipt ID?
The Receipt ID is a record of the transaction which can be referenced when contacting customer support.
Where can I find my destination bank account or debit card number?
  1. Log in to your Pay Portal.
  2. Click History
  3. Click on the transaction description to view the details.

Note: For security reasons, only the last four digits of your account information will be displayed.

It is past the estimated deposit date. Why haven't I received my funds?

Our goal is to send your funds to you as quickly as possible. However, once the transfer has cleared our systems, processing times can vary according to the receiving bank and any intermediary financial institutions involved in the transaction. Depending on your country and region, some transfers may take longer than others to be received.

Why am I getting multiple emails?
If you have initiated multiple transfers from your Pay Portal, you will receive separate cash out notifications for each transfer.
My payment amount is different than I anticipated. Why?
When a payment is initiated, the amount transferred from your Pay Portal will be deducted, along with a transfer fee (if applicable). In the case of wire transfers, the recipient bank may impose processing fees which will be deducted from your balance.

Security and Privacy

How do I spot a phishing email/website, or fake, fraudulent communications pretending to be Hyperwallet?

A Hyperwallet communication will never:

  • Ask payees to click on links that take them to a fake website- A link could look perfectly secure. If you’re on a computer, you can hover the mouse over the link to see the true destination. If unsure, you should not click that link.
  • Contain unknown attachments- You should only open an attachment when you're sure it’s legitimate and secure. Some attachments contain viruses that install themselves when opened.
  • Convey a false sense of urgency- Phishing emails are often alarmists, warning you to update the account immediately. They're hoping victims fall for their sense of urgency and ignore warning signs that the email is fake. 
  • Have Poor Spelling or Grammar- The email uses strange salutations, odd wording, poor grammar or spelling errors.

 You can learn more about recognizing and preventing fraudulent activity here

How do I report fake, fraudulent or suspicious communications?

Emails or Websites 

If you receive a suspicious email or website link: 

  1. Don’t click on any links inside of the email or on the website, and don’t download any attachments.
  2. Forward the email and/or website to hw-phishing@paypal.com and delete it from your inbox.
  3. If you notice any unexpected activity on your Hyperwallet account, please also contact our support team.

SMS/Text Message

If you receive a text message with a link inviting you to visit a website:

  1. Don’t click on any links inside of the SMS text message.
  2. Screenshot the message and email it to  hw-spam@paypal.com
  3. Make sure that the message shows the full telephone number. 

Telephone Call

If you receive a suspicious telephone call:

  1. Take a screenshot of your phone log showing the telephone number and email the screenshot to hw-spam@paypal.com
  2. Include details of the telephone call, including what the caller stated or asked from you.

If the caller left a voicemail, and you’re able to view a transcript on your mobile device, include a screenshot of it in your email.

When you send an email to hw-spam@paypal.com, you’ll receive an automatic message letting you know we received it.

You can learn more about recognizing and preventing fraudulent activity here.

What should I do if I shared my personal and financial information on a fake website?
  1. Change your Hyperwallet password immediately.
  2. Contact your bank and credit or debit card issuer and let them know what happened.
  3. Review your recent Hyperwallet activity to make sure you authorized all the payments.
  4. Report any unauthorized payments or activity to Hyperwallet.

You can learn more about recognizing and preventing fraudulent activity here.

Customer Support

How do I contact Customer Support?
Please refer to the Support tab at the top of the page for support hours and contact information.

Contact us:

Email Support

Please login to PlanNet Marketing and use the form provided under the Support section to send us your question. If you have issues logging in, please contact us by phone.

Telephone

Live Customer Support Representatives are available:

English: Monday - Friday from 08:00 - 20:00*, Saturday & Sunday from: 08:00 - 17:00*
Spanish: Monday - Sunday from 08:00 - 17:00*
French and Mandarin Chinese: Monday - Friday 08:00 - 17:00*

*Please note all the hours mentioned above are in Pacific Time.

U.S.A. / Canada Toll Free: 1-855-244-7984
• Worldwide: 001-778-410-2233

If your card is lost or stolen, please immediately report it to us, any time of day and any day of the week. Our agents can then assist you by cancelling the card and issuing a new one for you.

Chat

Chat support may be available if offered by your company. Please be sure you’re logged in to take advantage of our live chat feature. If you’re logged in already, look for the chat icon in the bottom-right corner of the page.